
NATSPEC National Classification - Autodesk Import Template
NATSPEC are in discussions with Autodesk to have the NATSPEC National Classification included in the available classifications for selection as part of the Autodesk Standardized Data Tool for Revit.
To assist this process NATSPEC have created an excel file of the National Classification, using the Autodesk Classification Import Template. The template file provided by Autodesk is to allow users to import and implement their own classification systems as they require. As an interim measure, NATSPEC have populated the template provided by Autodesk to include the NATSPEC National Classification and have made the file available for free download.
The downloaded excel file will allow Revit users to implement the NATSPEC National Classification within Revit as required, until the National Classification is simply available for selection within the Autodesk Standardized Data Tool for Revit by default.
Autodesk Import Template Download
Introduction
Although the NATSPEC National classification system was designed for organising the content of specifications, it is a useful means of organising other types of construction information such as building product and technical literature used during design and construction processes.
These include:
- Internet Bookmarks or Favorites folders for links to webpages.
- Computer folders for digital files.
- BIM object libraries.
- Office libraries of printed documents.
A number tools to help you organise and file this material can be downloaded from this page.
Building product and technical information is collected to inform design decisions and as reference material during the documentation of a project.The advantage of using the NATSPEC classification system for organising this information is that it provides a common thread for linking information used in design and documentation workflows. Filing information by the NATSPEC classification system from the outset saves having to repeatedly reorganise or reformat it. Apart from reducing the amount of work involved, it reduces the risk of errors and omissions.
THE NATSPEC Classification system
Some construction classification systems are designed specifically for organising information on building products including Omniclass Table 22, Uniclass Table L and SfB Tables 1 - 3. None are currently formally supported or widely used across the Australian construction industry.
Being purpose-designed, these systems are fine grained, i.e. locations are included in the system for numerous individual products. The NATSPEC classification system has a coarser grain because it groups items under broader headings. However, this is generally adequate for most practitioners’ practical purposes.
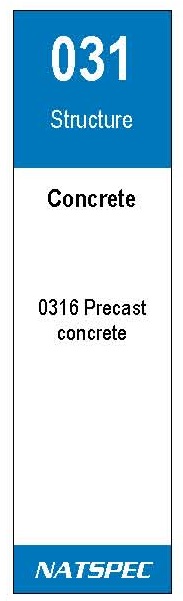
The classification system follows a hierarchical structure (from general to more specific) to classify information related to construction work. For example:
Level Level name Example
1 Workgroup 03 Structure
2 Subgroup 031 Concrete
3 Worksection 0316 Precast Concrete
NATSPEC Classification Tools
NATSPEC provides a number of tools based on the NATSPEC National classification system to make the process of organising and filing information easier. The greatest benefits accrue when the tools are used together. See Figure 1.
The value of the tools can also be multiplied if used in conjunction with a NATSPEC-based keynoting system which assists the coordination of specifications and drawings. The NATSPEC Keynote Framework file can be downloaded from the Keynoting Framework page.
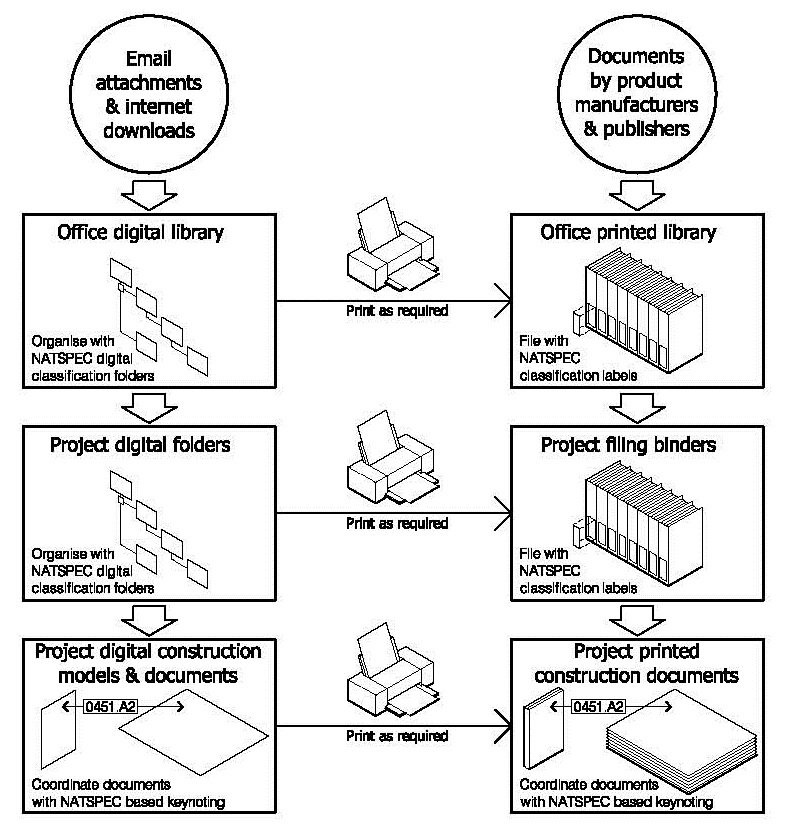
Figure 1: Linking information with the NATSPEC classification system
Digital filing folders
Use the folders in the downloadable zip file to organise files on your computer. When loaded into Windows Explorer or Mac Finder they can be used to store files sent to you or that you download from the web. These include technical articles, product data sheets, CAD files and BIM object files. Setting up separate sets with names like ‘Products’, ‘Technical Information’, ‘Object Library’, etc for each type of information will make information retrieval easier.
Likewise, when loaded into the bookmarks or favorites file of your internet browser, the folders provide a convenient way of organising web addresses by the same system.
Label templates for physical binders
Most offices have a collection of printed trade or technical literature. Without a filing system this material can quickly become disorganised, making it difficult to find items when needed. To assist the filing process NATSPEC provides label template files for printing ready-made labels for binders.
They come in 2 types:
- Adhesive: For direct application.
- Non-adhesive: For insertion into clear plastic holders.
Each type comes in 2 sizes:
- Narrow: For the spines of narrow ring binders.
- Wide: For lever-arch files, etc.
The adhesive label templates are preconfigured for Avery sheet labels for laser and inkjet printers. The product codes of the Avery sheet labels required are included in the instructions below.
Format of folders and labels
|
|
The downloadable digital folders and labels are organised by Workgroup and Subgroup. Folders do not extend to Worksection level but can be added to Subgroup folders as needed. For similar reasons, labels show only 3 digit Subgroup numbers. Worksection numbers and titles can be added as required. Figure 2 (left): Typical binder label showing, from top to bottom:
|
Using the classification tools
Managing product and technical information in your office
Although product and technical information can be collected and organised by everyone in an organisation, even small organisations usually benefit from having this process managed on their behalf by one person, e.g. a librarian.
Filing information according to the classification system as you make design decisions makes it easier to progressively build the specification during documentation of the project. This is preferable to leaving specification writing to the end of the documentation phase, which involves reviewing earlier notes and increases the risk of omissions.
Filing manufacturer’s product catalogues
This TECHnote is generally applicable to filing individual documents and files. Manufacturers’ product catalogues may require a different approach. The most practical approach is probably to file all manufacturers’ catalogues separately from the folders labelled with classification numbers and arrange their names alphabetically. While it makes updating catalogues easier, this dual system relies on library users being familiar with the products of each manufacturer – not an unreasonable expectation.
Other options include:
- If all the catalogue content falls under the same classification number, label it with the number and place it in on the shelf in numerical order.
- If the content falls under a number of different classifications, redistribute it to binders labelled with the appropriate NATSPEC classification number.
Whatever approach you adopt, it should be applied consistently.
Any information that does not include a publication date should be date-stamped to assist updating procedures.
Instructions for downloading and using the tools
Digital filing folders
NATSPEC digital filing folders [32 KB] Download
Copying the folders into Microsoft Internet Explorer
- Navigate to the location where you saved the folders on your system.
- Select the folders required using the Ctrl or Shift keys and select ‘Copy’ from the right-click menu.
- In Microsoft Internet Explorer select ‘Favorites/Organize Favorites’.
- In the Organize Favorites dialogue box, click on the ‘New Folder’ button.
- When the ‘New Folder’ icon appears, type the name you want for the new set of folders, e.g. ‘Products’ and hit ‘Enter’.
- Highlighting this folder with your cursor, select ‘Paste’ from the right-click menu.
Using the folders with other browsers, e.g. Mozilla Firefox
After loading the folders into Internet Explorer, import them into your browser using instructions in the help pages.
Label templates
20 x 74 mm insert labels template [DOC 80 KB] Download
48 x 96 mm insert labels template [DOC 90 KB] Download
24 x 64 mm adhesive labels template [DOC 206 KB] Download
60 x 200 mm adhesive labels template [DOC 174 KB] Download
Note: The adhesive label templates are preconfigured for the following Avery sheet labels:
- 24 x 64 mm: Avery 959060 White Mailing Labels for laser printers.
- 60 x 200 mm: Avery 959035 White Lever Arch Labels for laser printers.
- 60 x 200 mm: Avery 959059 White Lever Arch Labels for laser printers (includes softeware CD).
- 60 x 200 mm: Avery 936051 White Lever Arch Labels for inkjet printers.
Caution:
- There appear to be many different sizes of label holders so you might have to adjust the size of insert labels in the templates to suit your binders.
- The availability of Avery label sizes may vary. If you use adhesive labels in sizes ohter than those listed you will have to copy the label text to an Avery template made for that size.
- Slippage or misalignment of the printer paper feed can result in incorrect alignment of labels on adhesive sheets. You might have to experiment with different settings to get a satisfactory result.
Using the label templates
- Select the appropriate label template file for your binders and download.
- Open the file selected and make any edits required. Note that templates for narrow labels include some blank labels which can be used to create multiple copies of a particular label, if required.
- Load plain white A4 paper or light card into your printer for non-adhesive labels or the appropriate Avery A4 label sheet for adhesive labels.
- Using print preview, select a page with the required labels and print a test page.
- Make any necessary adjustments and print the remaining labels required.
- Trim non-adhesive labels to size and insert into the clear plastic holders on the binders.
- Peel adhesive labels from their backing sheets and apply to the binders.